
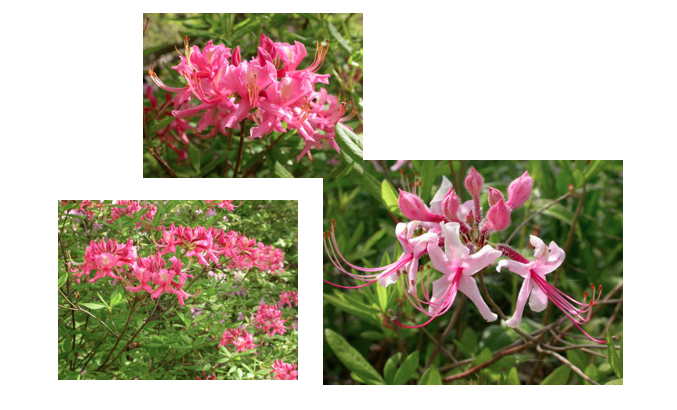
Pinxterbloom, Pink Azalea
Click here to download directions
Botanical Name: Rhododendron periclymenoides
Family: Ericaceae
Genus: Rhododendron
Species: periclymenoides
Noteworthy Characteristics Pinxterbloom azalea is a deciduous shrub native to moist woods, swamp margins and open areas from Massachusetts to Tennessee. It is a dense, bushy shrub that typically grows 2-6’ tall. Clusters of soft pink to white, slightly fragrant, funnel-shaped flowers (to 1.5” across), each with 5 long curved stamens, bloom in April immediately preceding the emergence of foliage. Oblong to elliptic green leaves. Pinxter means Pentecost (seventh Sunday after Easter) in Dutch, in reference to the bloom time for this shrub. Synonymous with and a/k/a R. nudiflorum.
Culture Best grown in acidic, humusy, organically rich, moisture-retentive but well-drained soils in part shade. Tolerates dryish, sandy or rocky soils. Prefers a sun dappled or high open shade. Tolerant of sun in cool summer climates. Good soil drainage is essential (doesn’t like “wet feet”). Shallow, fibrous root systems will benefit greatly from mulch to retain moisture and stabilize soil temperatures.
Garden Uses Mass, group or specimen. Shrub borders, mixed borders, woodland gardens and shade gardens. Also effective in foundation plantings or as a hedge.
Propagation
As you will see, these seeds are tiny, lightweight and feathery; cleanliness and moisture, but not in excess, are the keys to success!
Use a small prepared-food container (black bottom, about 2 inches deep, with close-fitting semi-transparent plastic top). Wash in the dishwasher to clean thoroughly. Drill some holes in the bottom. (Alternatively, use a new or a cleaned (with bleach solution) 4 inch plastic pot). For a food container, I'd just use 1. For plastic pots, I'd use 2 for the 15 seeds.
You want a fine textured, sterile, seed-starting mix like Germination Mix from Gardeners' Supply in VT. Put some in a bowl or basin. Rub it through your fingers to break up any lumps. Then add some water, and mix with your fingers. You want it moistened, but not as wet as you would initially guess. Add water a bit at a time, until it seems like a handful will "hold together" and definitely be moist, but not be "soaking wet." Put it into the container or pot and press down lightly. Then mist with water.
Next step is optional, but desirable for avoiding disease: Spread some milled sphagnum over the top of the surface. (Just a thin layer, but all over). Spray generously with the mist bottle. (If you have some sphagnum, just rub it between your fingers to make finer particles, like "milled" sphagnum. The spray gets the sphagnum moist, as it is dry to begin.)
Now sow your seeds on top of this medium, spreading them out. Then mist again. (Seeds are tiny, and should not be covered. And they actually need light to germinate).
Next cover with plastic, but so that light can get through and tightly enough that you will not need to water it for some time. Can just periodically mist again if it seems to be drying. (A food container with a tight lid holds moisture well or it can be placed in a ziploc bag. If you use 4 inch pots, put in ziploc bags after misting). Then put under lights indoors, or in a place to get natural window light BUT NO DIRECT SUN.
Keeping the temperature cool is preferable, anything under 70 should be fine. They don't need a high temperature. Lower temperature is even better.
Look at them every week. In about 3 weeks you should see some germination. They will be very small at first. Gradually remove the tight lid (if it has one) or open up the ziploc if you have a pot in a ziploc. Water by misting or using a watering can with a very small spout.
When there are true leaves of a size that can be handled easily, transplant to a peat-based medium, holding by the leaves. Use a Pro Mix type, not a container potting mix with either fertilizer added or moisture control.
You may fertilize with a very weak soluble fertilizer, like a Peters 20-20-20 or anything similar. Put multiple seedlings in pots that are fairly shallow. A tiny seedling doesn't like to be alone in a big pot. After they have grown some more, you can transplant to individual clean plastic pots, such as 4 inch standard depth pots or nice round shallow depth pots. Keep fertilizing, but with very weak strength.
Once transplanted, they can take more light, but still be careful not to let them dry out or to get too much direct sun. Once you get to late February, the longer days will lead to more growth. (Of course, those who have greenhouses will be at an advantage, but it is totally possible without a greenhouse).
Always use plastic pots. Clay dries out too quickly, and azaleas don't like that.
Note for Zone II Gavel Competition Planting
You are going to have a variety of sizes to select from for the Zone II gavel competition. If the plants are large enough, a 5 inch round azalea pot (these are somewhat shallow, also what is sometimes called a bulb pot or pan) would be perfect for the competition and will likely be specified. But, you may consider a choice of a similar smaller or larger pot to be commensurate with the plant size.
The competition will look for size and shape and good foliage color. A tall but single-stemmed specimen would be less desirable than a plant half that height but with 4 or 5 shoots. (If plant goes into growth as a tall single shoot, you cut off the tip to get branching).
With Appreciation
Plant selection and azalea planting information was generously provided by Dr. Dorothy Swift, “the rhododendron lady” of the RI Wild Plant Society. Dr. Swift was an oceanographic researcher with an intense gardening hobby (1971 - 1995) and headed a propagation project for the MA Chapter of the Rhododendron Society for 10 years (1976 - 1986), mainly seeking out lesser known hybrids and growing plants from cuttings. For the past 15 years she has taught oceanography, general biology, and currently microbiology at CCRI in Warwick, RI.